Monthly Archive:
ArchivesCybersecurity ventures stated that cybercrime is expected to grow by 15% every year. They predicted that those crimes might cost $10.5 trillion annually on a global scale by the year 2025. Security testing plays a vital role in preventing most of these crimes.
In this article, let’s look at five security testing challenges and how to tackle them.
Generally, security requirements are not given equal importance as functional requirements. Sometimes security requirements are considered post-developing certain modules and, in some cases, it is before pre-release. Not defining the security requirements prior makes security testing difficult.
Solution:
Functional test cases are typically given a high level of importance. Even though we write positive and negative cases, it doesn’t have quality test data to cover security use and misuse cases. Sometimes test cases are written before security testing starts. In some cases, security testing is done ad hoc without writing any test cases.
Delaying the test case writing reduces the efficiency and effectiveness of security testing. Since we follow agile methodology, updating the test case based on the new or modified requirements is essential.
Solution:
API security is as important as front-end security. Most of the attacks that happened through security testing at the API level, remained unnoticed unless we were given access to the database. Also, APIs might have some sensitive data exposed to unauthorized users.
APIs are developed early. Therefore, API security testing ensures the basic security requirements are met.
Solution:
This is the biggest challenge. We decided to implement security testing and started self-learning. But there were only a few resources online. Security testing is vast, and we weren’t sure about the proper methods.
Outsourcing might seem a good option but handing the security testing solely to an external team is not preferable. It would be time-consuming, and we might miss some critical security bugs.
An internal team can perform effective preliminary testing as they are aware of the sensitive data to be protected, source code, and requirements.
Solution:
There are various tools available for security testing. The skillset of the tester and the budget determine the selection of tools. Initially, I was using OWASP ZAP. Then I started using Burp Suite on a tech lead’s suggestion.
ZAP is best for API security testing. It is more convenient to get and view all APIs in a site tree using ZAP. Burp Suite is the most preferred tool by most web security testers. Burp Suite’s intercepting proxy lets us view and modify requests/responses conveniently and shows how UI responds to them.
Solution:
Due to time constraints, when a secure software development cycle isn’t practised, it is only possible to do ad hoc testing for security. Since the security requirements are not defined, and the sensitivity of the data is not recorded anywhere, it is tough to conclude a security bug. So, the confidence in security test coverage is low. This could lead to an unpredictable release.
We could easily achieve the basic level of security of an application in a new project if we follow the above solutions. In an ongoing project/product, it is partially feasible to implement the BDD method of agile security testing.
Defining security requirements early would avoid conflicts and confusion in the later phases and minimizes security-related bugs. It improves the accountability of the internal team on the security of the application, thereby resulting in a predictable release with minimum cost, stress, and risk.
Authored by Shamphavi Shanmugasundram @ BISTEC Global
Vue 3 Composition API provides a new approach to organizing data models and functions. Previous options of API don’t provide features to organize models or business logic in a logical manner. Composition API provides a great feature to organize codes, in a more reusable manner and it improves the readability of big components.
Option API distributes codes among data block, computed blocks methods, and watch functions. Code has been spread in all the places there is no logical fragmentation. That structure is what makes it difficult to understand and maintain a complex component.
However, when we are working with bigger code blocks it’s convenient to fragment code blocks based on logical concerns. It would be much nicer if we could collocate code related to the same logical concern. And this is exactly what the Composition API enables us to do.
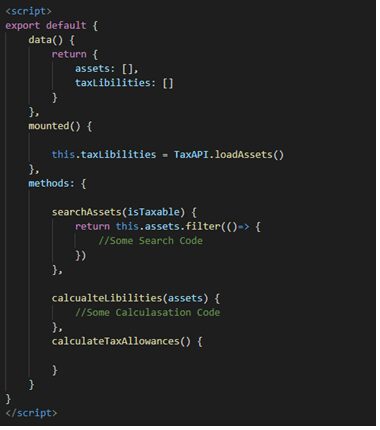
If you have experience with Vue Js 2, you must have seen the Option API, where the codes aren’t fragmented in a logical manner based on its functionality. A component might look like this. If we apply different color codes for code fragments according to the Vue Composition API RFC showing how code fragments will be.
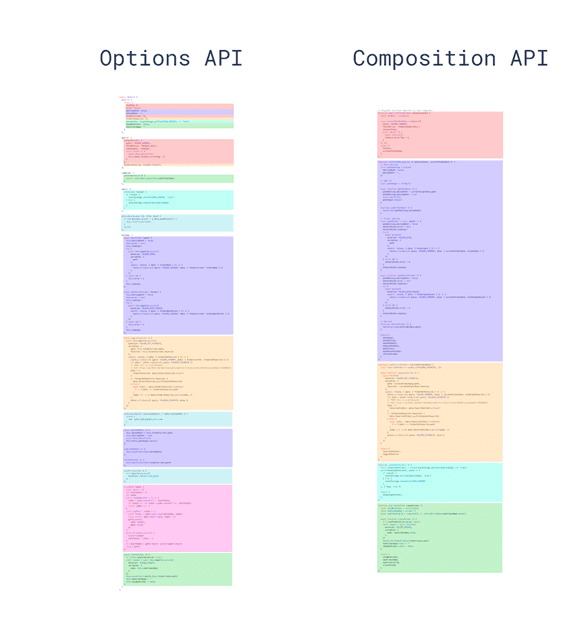
Here, the goal is to fragment codes based on their feature / logical functionality. Using Composition API, we can extract this logic and place it in separate files. And we can consume those inside the Setup method in Composition API. The separation of options obscures the underlying logical concerns. In addition, when working on a single logical concern, we have to constantly “jump” around option blocks for the relevant code
Nuxt Js provide Composition function using Nuxt Composition API. @nuxtjs/composition-api module that brings first-class Composition API support to Nuxt. The @nuxtjs/composition-api package is a wrapper over a @vue/composition-api plugin which means that along with Nuxt-specific utilities it contains all “standard” Composition API functions like ref or computed.
Before starting the feature of the Composition, first, we will look into how Nuxt Composition API addons facilities to us to work with Composition in Nuxt Project. To enable Composition in Nuxt project we have to setup NuxtJs Composition API.
The installation is straightforward, just like with every other Nuxt module. First, we have to install the package:
npm install @nuxtjs/composition-api –save
And register the module in our nuxt.config.js
{ buildModules: ['@nuxtjs/composition-api' ] }
The module is registering @vue/composition-api plugin under the hood so we can immediately use its features in our project without any additional code.
The @nuxtjs/composition-api provide SSR capabilities within Composition.
UseFetch which is a Composition API wrapper for a well-known Nuxt fetch that is commonly used to fetch asynchronous data (both on a server and client-side)
It does two things:
It makes sure that the asynchronous function that passed as its argument resolved. Then the result conveyed to the client-side through the window. NUXT object and picked up by your client-side code as its initial state.
It prevents the client-side execution if navigation has been made on a server-side. Because of that, we are not performing unnecessary network calls if we already have the data from the server-side fetch.
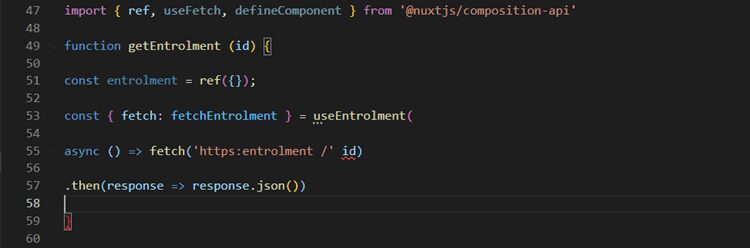
To make use of useFetch in our composable we just need to wrap it around our asynchronous code:
Among data-related server capabilities, Nuxt composition API is delivering a set of composable to interact with other composable APIs. One of the most helpful features is the use of Context. As represented in the name, it facilitates us to access Nuxt context inside our composable. We can use this instance to access router, store, and properties via Nuxt Modules.
In Vue 3 Composition, Vue Context is accessible inside the Setup() method only. It’s not allowed to accessed outside. Therefore, if we want to access the Context in different Compose files, we have to pass context as a parameter to the specific file. With the help of the use Context () method we can access Context Object inside any Composition API.
Let’s see how we can organize our component by feature and reuse our code across other components. In this below example it’s a Student Portal that has three main feature areas; those are Course Enrolment, Showing Progress Report, Showing Student Profile. If we see the functionality of the student portal, we can clearly identify that it has three modules as follows.
Let’s see how we can organize the code using Composition API.
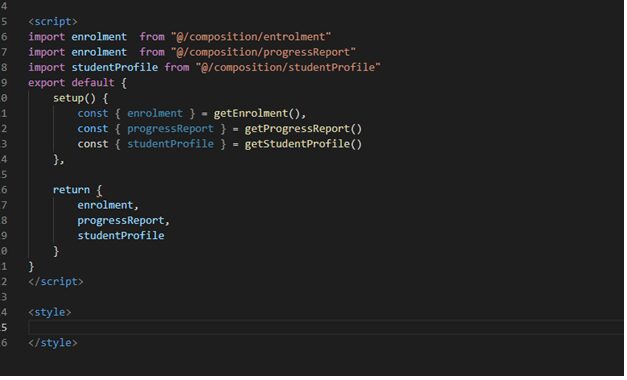
Here Enrollment, Progress Report, and Student Profile moved to different files. Its related fields and methods are also placed in the same file. Therefore, it’s more human-readable and meantime maintainable. And we can use the above compose section anywhere in our application as used on this page.
There are two approaches available to build reusable components in the Vue application. Both have their strength and weakness. Those are using Property and using Slot. We have to select the correct approach based on the needs.
For example, there is an Address Component that used to capture the address of the student. The same component has been used to capture local addresses and foreign addresses as well. So based on the country, the address fields should changed. This has been achieved using Props for the component. The component has multiple props to change the behaviour of the component.
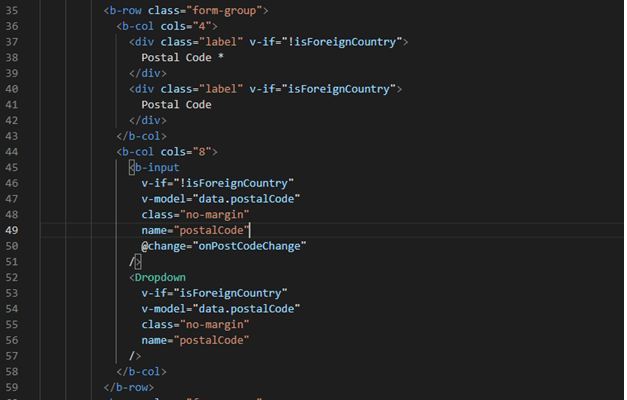
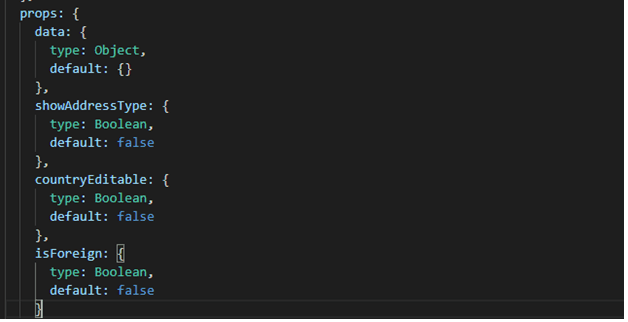
This approach is suitable for small components. If the number of props increases, it’s difficult to manage the component because we are introducing logic inside the component to maintain the state. It’s difficult to understand.
To handle this scenario with Vue 2.6 Slot directive has been introduced. Through this, we can distribute the content to the component. So rather than keeping the HTML content in a component and changing the behaviour based on the props. We can set the HTML content to the component from the outside.
So, we understand the whole concept from the definition of slots it’s about making components reusable. Now, we’re going to dive in with some examples showcasing Vue slots and talk about how to make use of them.
We will take the same example and see how we can use Slot instead of Props.
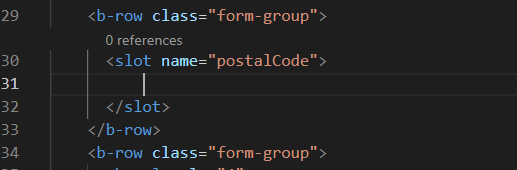
You can notice in the above picture that we have removed Drop down and Input Control and we have placed <slot> tag. This is going to work as a placeholder and when we are using this component we have to define the HTML Content for this Slot as given below.
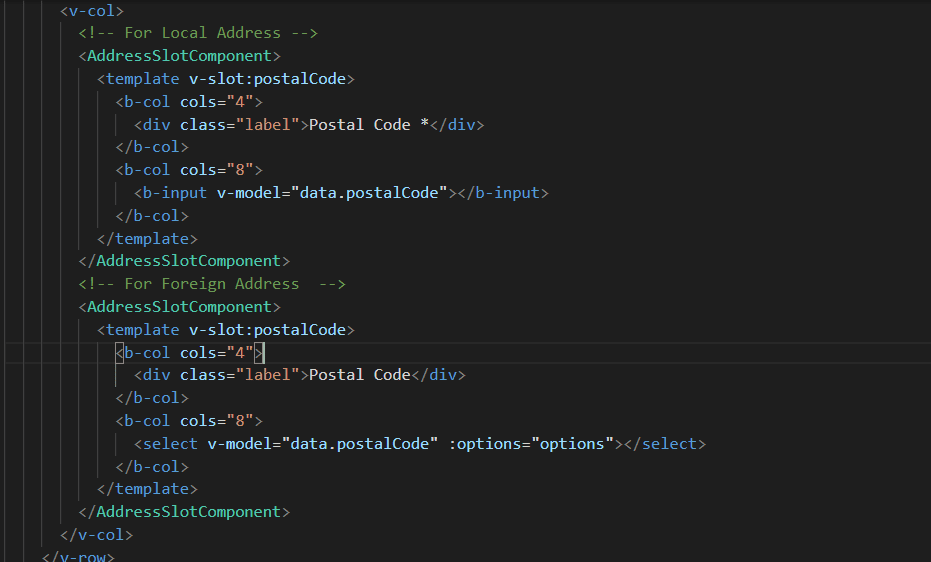
Through this, we can distribute the content to outside of the component. Therefore, we are able to control the component behaviour from the outside.
We have seen how we can use Nuxt Composition API to fragment code in a logical manner and how we can reuse them among the components. Meantime we can create reusable UI Components using Slot directives. The goal of the Composition API is to increase readability and facilitate us to create components in a more reusable manner.
Authored by Deepakumar Ganeshamany @ BISTEC Global
Source Code: https://github.com/bistecglobal/VueCompositionAndComponents
Building software can be like creating a work of art sometimes. It requires creativity in design, and plenty of craftsmanship to do well. However, over the years, the methods of testing have evolved greatly, and this short blurb focuses on one of the current favorites, the “𝐀𝐠𝐢𝐥𝐞 𝐭𝐞𝐬𝐭𝐢𝐧𝐠” methodology.
As you probably know, Testing is not a phase, but an ongoing activity. all stakeholders including the developers are part of the agile testing method, which results in shortened feedback time. In agile software development in itself driven by testing from the early sprints itself.
“Pair testing” is a notable feature in today’s Agile testing method, where a member of the QA team works closely with a member of the development team to iron out the defects found during each sprint. These informal pairs work together as and when required, speeding up the debugging process effectively. To further strengthen its effectiveness, the team collaborates with the end-user to gather feedback after the completion of each sprint cycle.
Among the key benefits of the “whole-team approach” to product development are the enhanced communication and collaboration within the team, the enabling and best use of the various skillsets that are found within the team for the benefit of the project, and perhaps most importantly, making quality the responsibility of every member of the team.
At the best, Agile development is robust and proactive. Agile testing is robust and energetic the relatively mundane, predictable modules that need testing can easily automated. These include the common regression tests, unit tests, high traffic pages, cross-browser tests, and data-driven tests.
However, it is an important responsibility of the QA team to effectively prioritize the tests that can automated while those such as usability tests, one-off tests, testing the brand new features, and exploratory tests should not automated as they are specific in nature and cannot be reliably carried out by a machine.
These prioritized automated tests, then used by both the development as well as the QA teams. In addition, the QA team enhances the quality of the delivery by implementing performance tests and security tests as they see fit. At times, these tests carried out by specialized members of the QA team.
In the meantime, unit testing generally carried out exclusively by the development team and the responsibility of the entire product does not lie with the developer or the QAE, but with each and every member of the team. Along with their formal expertise, each team member brings in his or her own individual strengths to the table; all of which efficiently used to achieve the common goal of a perfect software product that can implemented at the customer site.
Most importantly, working in collaboration, instead of doing so in rigid isolation, brings about the best in the whole team, in record time. The active participation of a representative from the customer ensures that there are no miscommunications between requirements and products. Good communication among all, from the inception to the completion of the project, ensures that much time and money saved and a great piece of software created.
Authored by Dhara Jayasinghe @ BISTEC Global
Employee turnover is a term that is widely used in HR analysis. Even though I am not an HR Professional, I know that people define Employee turnover differently.
And I’m going to go with the formula that is frequently found on the internet. (I’m pretty sure that if you learn this one, any other turnover formula will be easier to calculate using DAX 😉)

This formula seems pretty easy, right? Even so, calculating this in Power BI is a bit tricky.
Now roll up your sleeves because we are gonna do some serious DAX!😎
The only data we have with us to calculate the employee turnover are Employee ID/Name, Date of Appointment, and Date of Resignation (Whatever you call it in your organization)
To make everything easier, I went step by step breaking down the numerator and the denominator until the only pieces that left are the above data that I have.
I’ll explain using the DAX code itself.
The most important thing that you should have first is the Date Table. Believe me! It is a lifesaver! ❤️ You can simply use the CALENDARAUTO() function to create a Date Table. (There are some other functions too if you want to try them out.)
You’ll need the date table to refer to Employee start date(Date of Appointment) and Employee end date(Date of resignation).https://www.linkedin.com/embeds/publishingEmbed.html?articleId=7641001261280701347
So I am using an Employee Table which consists of Employee ID, Employee Name, Start Date, End Date, and other HR-related data.
Now let’s discuss how we can calculate turnover per month. You can tweak the code a bit to make it annual.
Make sure to add a column that calculates the Month and Year.
First things first, defining the variables! Put it simply, you need two main variables which you will be used to create other variables.
var MonthStartDate = STARTOFMONTH(‘Date'[Date])
var MonthEndDate = ENDOFMONTH(‘Date'[Date])
It’s time to get your hands dirty!
Now that you have Month Start Date and Month End Date in your hands, use the following code to calculate the number of employees during the month.

💡 You can use Start Date instead of End Date to calculate the number of employees joined during the month. (If you need it in another measure)
Here’s the tricky part!
You know that Average Employees in a period is calculated by dividing the sum of Employees as at the beginning of the month and Employees as at the end of the month by 2.
So I calculated these two separately.
Let’s talk about how we can calculate the number of employees at the beginning of the month. And you’ll be able to figure out the second by yourself.
Here’s what I did. I calculated ALL the employees joined until the beginning of the month. Then ALL the employees left until the beginning of the month. And got the difference!

Done? There you go!
You can do the same thing to calculate the number of employees as at the end of the month.
Now you have all the ingredients. You cut and chopped and mixed it well. Now go! Bake it in the oven. 🤪
Here’s the recipe again, in a nutshell!

TaDa!!!!!! Now you can use the Month and Year from the Date table and the Employee Turnover from the Employee table in a visualization!
Pretty dope right? 😌
Authored by Maneesha Wickramasinghe @ BISTEC Global
We are here to help and support you.
If you believe that we can help you or your businesses requirements - do feel free to drop your details here and don’t hesitate to give us a ring.
Connecting with us on LinkedIn works best.


